One of the reasons I have been such a fan of WordPress over the years is that it provides an enormous amount of flexibility for a variety of use cases that span well beyond a blog.
I want to share how you can use WordPress to create a knowledge-base which could be a home for your community/product documentation, company handbook, support material, and more.
WordPress is not strictly designed to be a knowledge-base, so we will be getting a little creative here. It does provide enough to compete with commercial solutions such as ZenDesk Help and, due to the powerful WordPress core, provides plenty of expansion and customization possibilities which are often missing in commercial knowledge base products.
For our knowledge base we have the following goals:
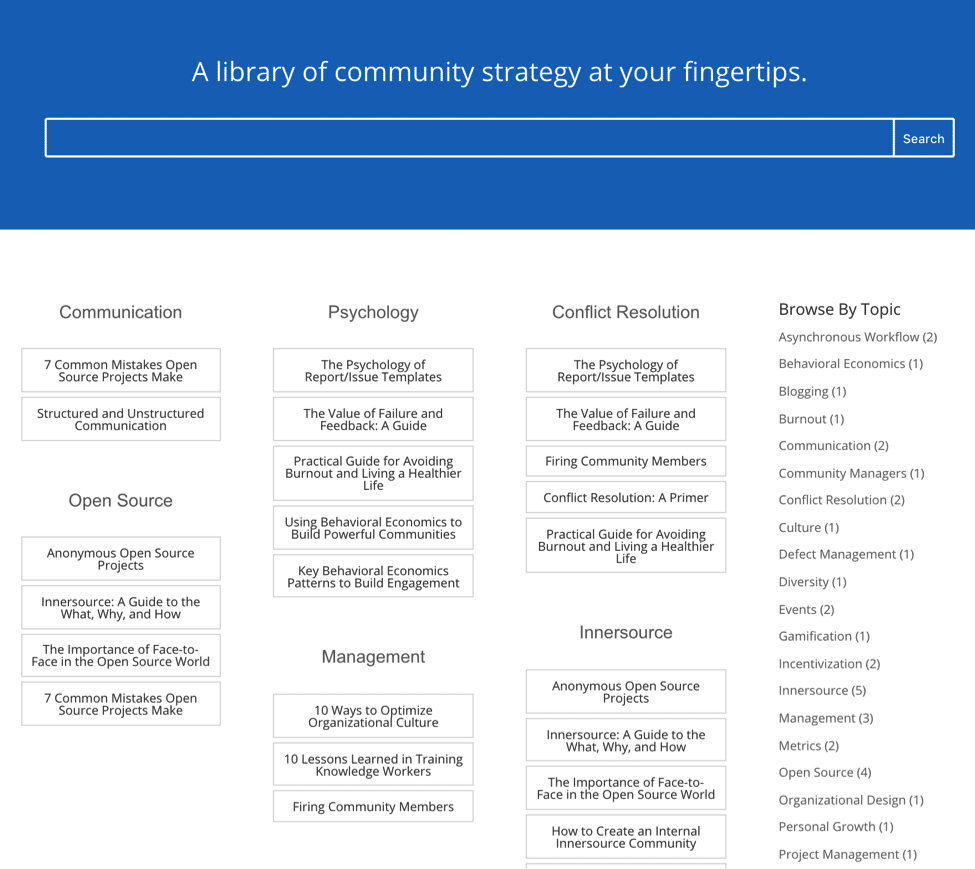
- A front page that lists recent content divided up into different sections.
- The ability to view a specific section and see the articles in it.
- Present simple, readable content.
- Have a search feature for finding material easily.
- Optimize our knowledge base so people can read related content.
Structure, themes, and plugins
From a structural perspective we will use the following WordPress content types in our knowledge base:
- Pages: Pages contain static information that changes rarely as well as more static chunks of content (e.g. books).
- Posts: Posts contain the individual knowledge base articles.
- Categories: We use categories to determine the different sections of our knowledge base.
There are dedicated WordPress themes that you can use for a knowledge base, but I recommend you use Divi. It is the swiss-army knife of WordPress themes, so we can use it not just for the knowledge base but also for our other web properties.
Also go ahead and install the following plugins:
- Contextual Related Posts: This will recommend other content at the bottom of articles, useful for reducing bounce rate.
- Relavanssi:This is our search provider. It will highlight keyword searches and more.
Optionally, you might want to install Ultimate Member, which provides finer-grained controls for which roles can access which content. We won’t get into roles, but Ultimate Member makes it simple to break content up into groups visible to different users.
Content and categories
Our first step is to create our different sections for our Knowledge Base. This will be somewhat dependent on your business, but they should be fairly broad (e.g. Marketing, Events, Social Media, Blogging etc).
For each section add this as a category in WordPress. Create 5-15 categories to get started with.
Now go and create some posts with some sample content. A key element of a knowledge base is that the layout looks consistent. As such, I recommend you stick to basic formatting (e.g. headings, emphasis, quotes, embedded pictures/videos etc). Avoid using the Divi custom layout functionality (this will make it easier to switch themes later if needed).
Front page
Let’s now configure the front page of the knowledge base to look the way we want it to. This is where Divi is particularly helpful.
For the front page, we are going to create a design like this:
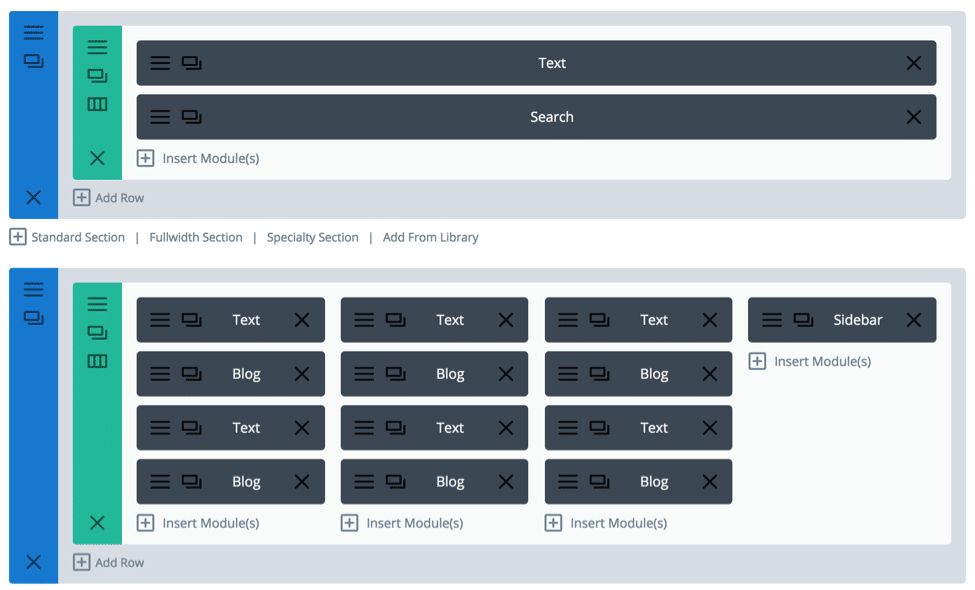
To get started, create the Front page in wordpress and using the Divi editor create the following layout:
The top Text and Search modules create the blue search box. You can use the design features in the module container to make it look the way you want (for example, mine has a blue background).
For the sections underneath, we use a Text module to display the section name and then the Blog module where we check the category for that specific section. This will show the most recent articles in that category.
Now, we do need to do a little hack. The Blog module typically also displays a sample of content from the article, so we want to hide this. In the main Divi configuration section, add the following into the custom CSS box:
/* blog module article list */
.article-cat-list .post-content { display: none; }
.article-cat-list .et_pb_post { margin-bottom: 0px; }
This will now just display the titles.
On the right side we also use Sidebar module. This is where we list all the different sections.
First go to Appearance -> Widgets and add a Categories widget into the the sidebar. This will now display your list of categories. Now when you use the Sidebar module it will display those categories in that part of the page.
Article Page Layout
The layout for each individual article page is relatively simple. Just use the default WordPress template when you create articles and it will default to also showing the categories in the sidebar (we are using the same widget).
You should also enable the Contextual Related Posts plugin and this will display related topics at the bottom of your article. This is a powerful technique for reducing the overall bounce rate on your site (which is the metric of how many people just visit that single page). We want to encourage people to bounce around and consume more content.
You might want to explore other WordPress widgets too for rating content, adding likes, or other desired functionality. WordPress has a vast library of options you can choose from. I would start simple though: people appreciate cleanliness and simplicity, so don’t weigh it down with clutter.
Adding Content Sets
While everything we have discussed will serve you well for adding knowledge base articles that can be found and browsed in individual categories, sometimes you may want to present a set of content that should be available together.
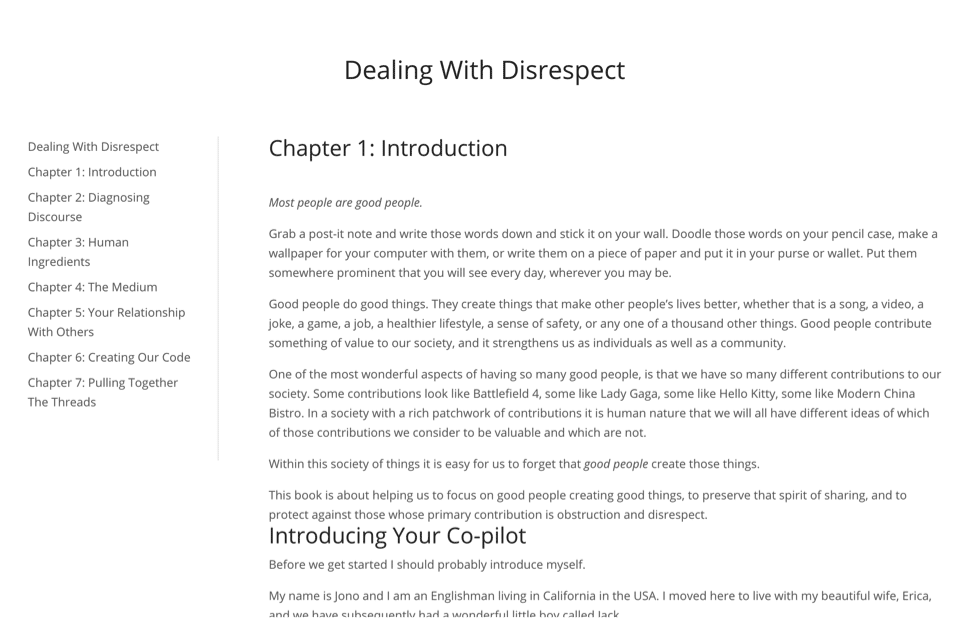
An example of this is a book, which you will want collected together in chapters in an additional sidebar such as this:
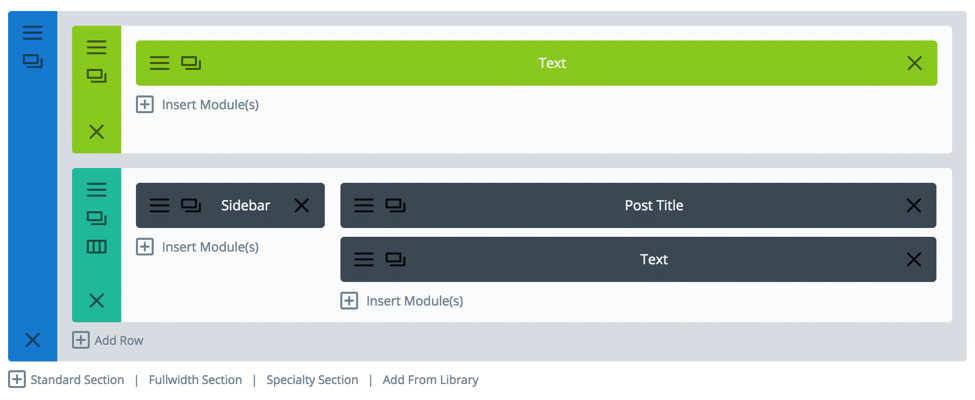
To accomplish this we need to add each chapter as an individual page (not a post). Create a Divi layout that looks like this:
The top text box has the name of the content (e.g. the name of the book) that should be displayed across each page for continuity.
Underneath, the Post Title module has the title of the chapter and the Text module contains the content.
To display the table of contents we are going to use a little trick.
First, go and add all the pages with content and then go to Appearance -> Menus and create a custom menu. Drag onto the menu the pages you created and order them how you want it (e.g. in numerical chapter order).
Now go to Appearance -> Widgets and create a new widget area. Add a Custom Menu widget and select the menu you just created.
Now add the Sidebar module on each page of content and select the widget area you just created. This will now display the custom menu we created in the right place.
This was merely a quick and concise introduction to building your WordPress based knowledge base, but it shows just how much is possible.
You can take this foundation and now expand on it to add additional functionality and features that map well to your specific needs. Good luck!


Join the conversation